Have you written any books? Are you looking forward to be published? Whether you are going trad-publishing or self-publishing, having your own author website can get you a step further. What’s better than creating a website to help you catch the attention of potential new readers?
So, if you are preparing for publishing your book, perhaps it’s the perfect time to start working on your author website. It’s not enough with an Amazon page for your book, or other similar platforms. You need a unique online presence, which would be your author website. A place for your readers to know more about you and your book.
Why do you need an author website if you are going to publish a book?
ONLINE MARKETING! That’s it. Perhaps you’ve thought of marketing your books on other platforms, like Twitter, Facebook, or even YouTube. And yes, those are easier ways to market your book and they’re free. However, creating an author website is essential when it comes to increasing sales and reaching potential readers. That doesn’t mean that Social Media is to be left aside, but having your own author website will bring these advantages to the table:
- Email list: A website will help you get the emails of all your potential readers. And everybody knows that email lists sell. Email lists are a powerful tool, and for some years now, email marketing has positioned as one of the most important marketing resources and the most effective online method to sell products.
- More credit as an author: Having your own website will show that you are a serious professional.
- It’ll be the link between you and your readers.
- It’ll be a showcase for your work.
Now that you might be convinced of why you as an author need a website, it’s time to start figuring out how to create one. Perhaps you are not tech-savvy, but that doesn’t mean this would be any more difficult for you. With our guide, we will make it a lot easier, so, as long as you read it completely and you put into practice our advice, you’ll nail it.
Don’t let the idea of creating a whole author website from scratch intimidate you. Focus on one step at the time and try not to get overwhelmed.
I got to say I’m tech-savvy but didn’t know anything about programming when I decided to create this website. The truth is that you don’t need to. WordPress makes things easier. It took me a while (weeks) to finally have a minimally functional version of a website because I had to work and study so didn’t have much time to devote to it. I also did it on my own, without anyone to guide me in the process. So, I had to figure out what was the next step every time. Fortunately, I’ve already gone through trial and error, so now I can offer my experience to you.
How to Create an Author Website in 10 Simple Steps
1. Choose your Hosting

The first step is choosing a hosting. The most important thing I need to highlight here is going self-hosted. This makes a huge difference. If you want to be taken seriously by readers, you need to avoid free hosts.
Being self-hosted will provide you with total control of the information you store in your hosting and will allow you to design, build and optimize your author website in a more complete way. Also, it’ll look more professional. Some platforms like Wix and WordPress.com are free, but they either put their branding on your page or offer you less customization compared to paid hosting providers. And again, your author’s website will represent you and your book, and picking one of these free options will send the wrong message.
Now that we’ve let clear the importance of being self-hosted, it’s time to select your hosting. Most people make this look like a big deal, but the truth is that there are many legit hosting providers, and their prices are similar. I narrowed my list to these three: Hostgator, Bluehost, and Siteground.
I personally use Hostgator. They have excellent customer service, my site has never had problems, and it works with WordPress.
2. Select your Domain Name
A domain is an exclusive name that will be assigned to your author website. This means that if someone types that URL into their browser, they will find your website.
Although you can register your domain through platforms like Google Domains or Name.com, you can also do it (which I recommend) through the hosting providers that I previously mentioned.
As an author, selecting a domain name will be one of your first branding decisions. Therefore, you have a big challenge finding one that’s still available for you. Here are some tips to help you pick the best domain name for your website.
- Be simple. Your name and last (pen) name is the perfect option. Avoid dashes.
- Research before registering your domain name. I recommend using the Google Domain Search tool to find out if the domain name you want is still available and to look for alternative options in case your name is already taken. Just don’t register your domain name there, instead, do it through your hosting provider.
- Don’t use the name of your book. It would be just fine creating a landing page for that. What if you write another book in the future?
- Try to get a .com domain name. But if the options with your name and those with slight variations are not available, then you can consider .org, .me, .net, and other domains. However, be careful when choosing, since it can affect your website’s traffic.
3. Look for Inspiration
If you want to have an amazing author website, you can get inspiration from people who’ve already succeeded with theirs. You can simply type in your browser the name of the authors you like and take a look at their websites. I recommend you take a closer look at Stephen King’s, J. K. Rowling’s, and E. L. James’. They have incredibly appealing designs with simple navigation and everything is nicely organized.
Take into consideration the way things are organized. Look at the header, the menu, their email sign up form, and if they have any links to other platforms or social media profiles. See what you like and what you don’t like and use it as inspiration to build your website.
4. Choose your Software
Unless you know programming, you’d probably want a software to make your life easier. And in fact, there are many to choose from, but I will recommend installing WordPress, which happens to be the one I know and use for my website. It’s the most popular platform among users, and there is a large community in case you need some help. Since it’s widely used, there are more themes and plugins that you can use while customizing your website. Plus, you can install it from Hostgator with a few clicks.
Therefore, from now on I will assume you’ll install WordPress (No pressure).
Once you install WordPress, you have a website! ‘So, that’s it? All this reading for nothing?’ Hold your horses, we are just getting started. Here is where the fun starts.
You now need to get familiarized with WordPress. I have to say, it’s very intuitive and easy to use. However, here are a few elements you need to know:
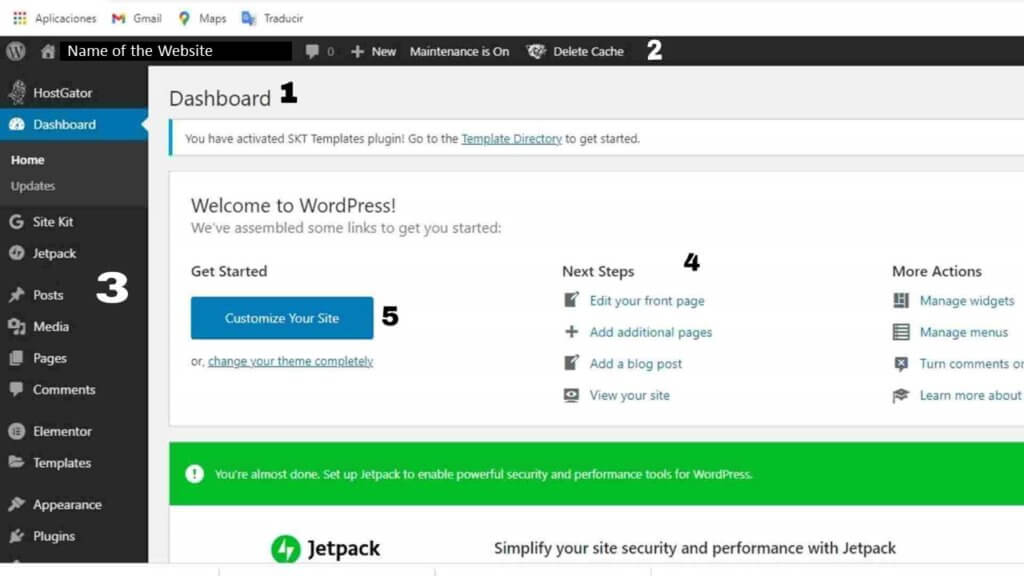
- Dashboard: This is the first screen you’ll see when you install WordPress and will provide you with useful shortcuts and basic information.
- Header Menu: It will show on every page if you are logged in and has a “+ New” button, which is a quick way to add a page or a post.
- Sidebar Menu: It’s the menu that appears on the left of the screen. It’s the main navigation for the “back end” (what only you can see) of WordPress. Here you have elements like appearance, posts, plugins and settings.
- Quick Launch Menu: It’s one of the shortcuts of the dashboard that offers you the possibility to write new posts and make quick changes.
- Customize your Site: It takes you to a page to change the appearance of your website.
Check this article to discover the 25 Best Free Online Resources for writers like you!!!
5. Install Basic Plugins
What is a plugin? An add-on that will give your site new functionalities.
First advice: don’t go crazy on the plugins or that will affect the speed of your site. I tell you this because I had to learn how to go easy on the plugins the tough way. You don’t want people waiting 10 seconds to get to your site, right? So, considering the huge amount of available plugins for WordPress (over 25,000), we’ve prepared a list of your must-have plugins to get your author website started:
- Yoast SEO: It’ll analyze your pages and help you with SEO (which will make your site rank better on Google).
- Google Analytics Dashboard for WordPress: It provides you with the statistics of your website integrating it with Google Analytics.
- Sumo: Although you need to create an account after installing, this plugin will make easier sharing your website, or posts on social media. It comprises sharing icons and email subscription tools.
- Jetpack: Protects your site from spam, and hackers, improves the speed, provides you with features like visitor stats and spell check.
- Optin Monster: Pop-up and slide over tool for email subscriptions.
- MyBookProgress: This plugin puts a progress bar on your website to let your readers know how is your WIP going.
- MyBookTable: This will help to sell your book, and have your own bookstore. It links to websites where your readers can buy your books, through beautiful buy buttons.
- BackWPup: This plugin will offer you automated backup of your website, just in case the worst thing happened.
- Gravity Forms: A plugin to easily make forms for your website, with many features and tools.
6. Choose a Theme
With WordPress, it’s easier to design your website, and the first part is selecting a theme. A theme will mark the aesthetics of your website – colors, structure, functionality, fonts, etc. Once you get a theme, you can start crafting your site to make it look the way you want to. You can find the themes in the sidebar menu/ Appearance/ Themes.
When it comes to themes you have two main options: free themes and premium themes (generally under $100). There are many of both, which makes things easier, but usually free themes are harder to customize.
As I said before, there are tons of free themes, and pretty much anyone can make a theme and upload it. Therefore, one of my pieces of advice is to pick a theme is to see the reviews first, to see if there has been any update and how many times it has been downloaded. Also, check when it was created and try to pick one that’s recent. Make sure it can adapt to all types of devices and is compatible with all browsers.
If a theme is popular, that won’t mean that everyone’s going to have a site similar to yours. Selecting the theme will have a strong impact on your website appearance, but there’s a lot to do after that to make your website outstand from the rest.
Here are some free themes for you to take a closer look at:
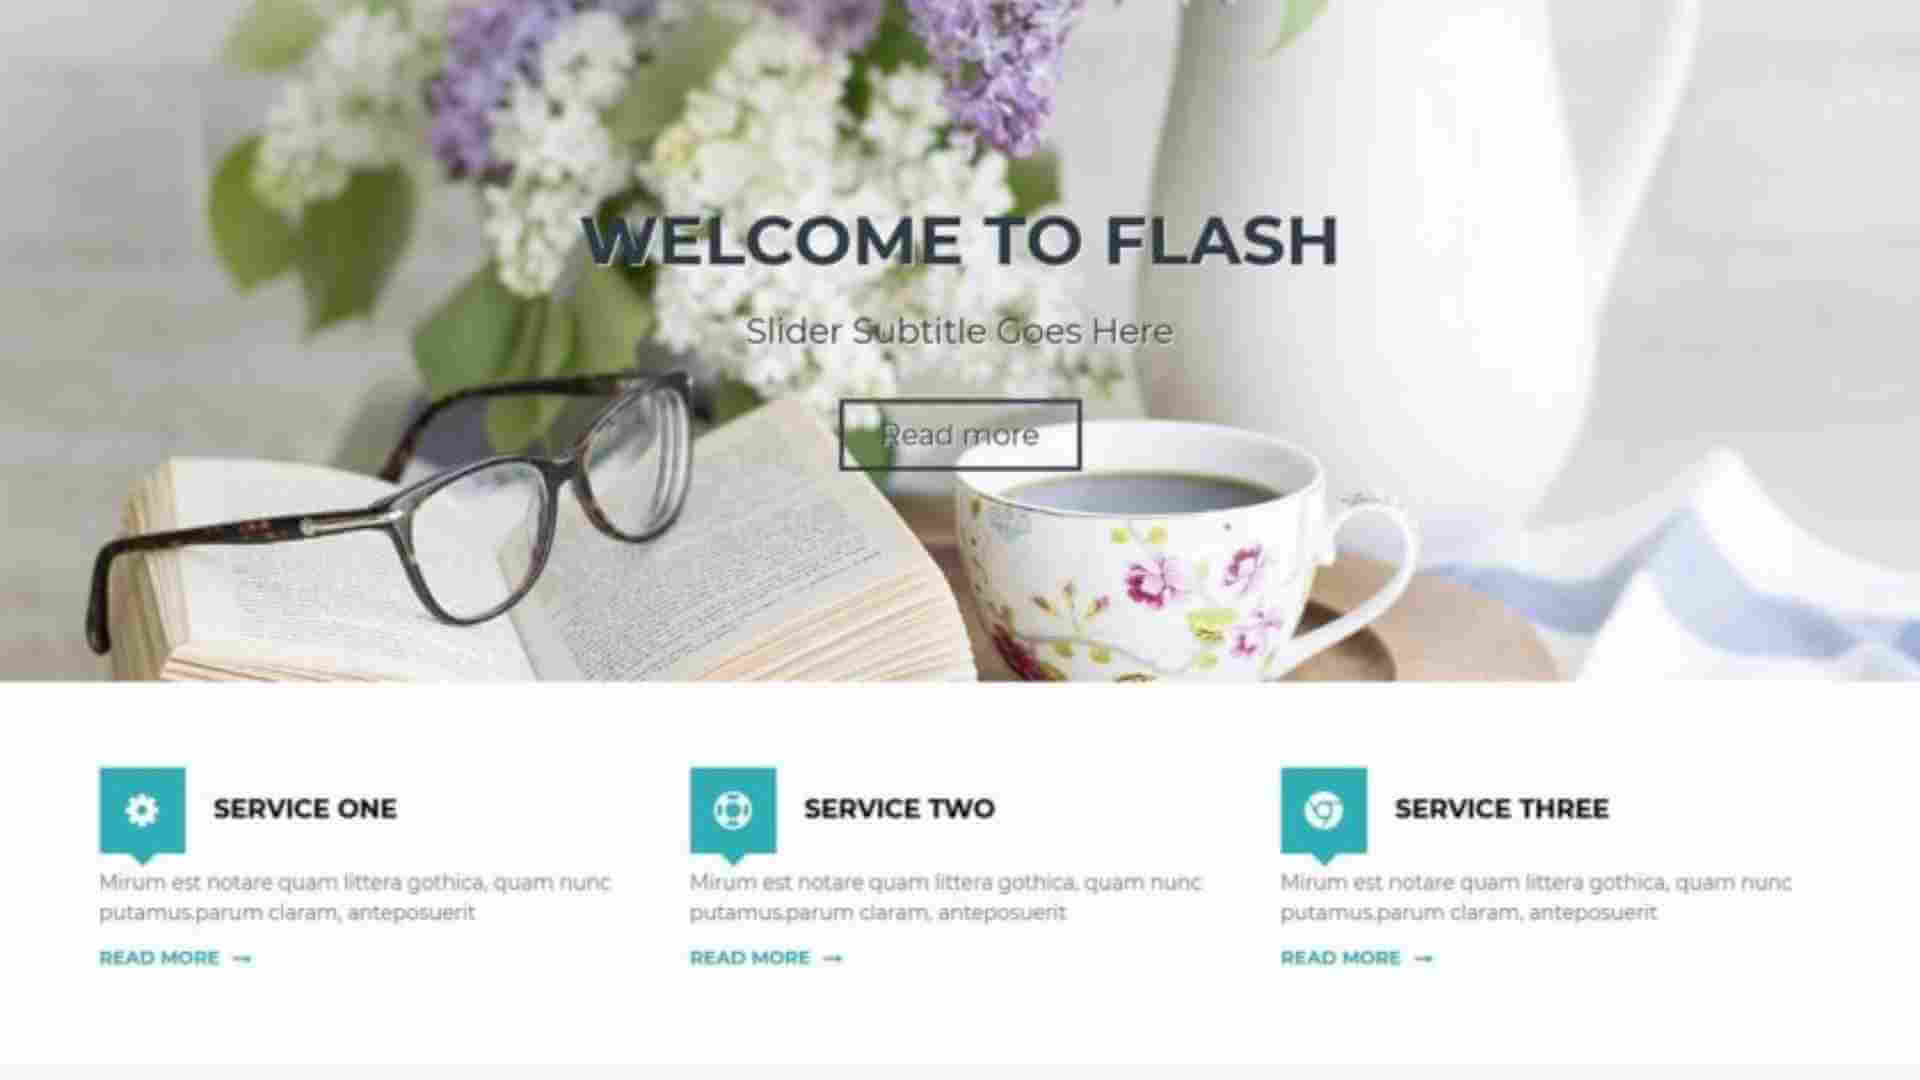
Flash: versatile, with customizable widgets, great performance, and pre-built demos.
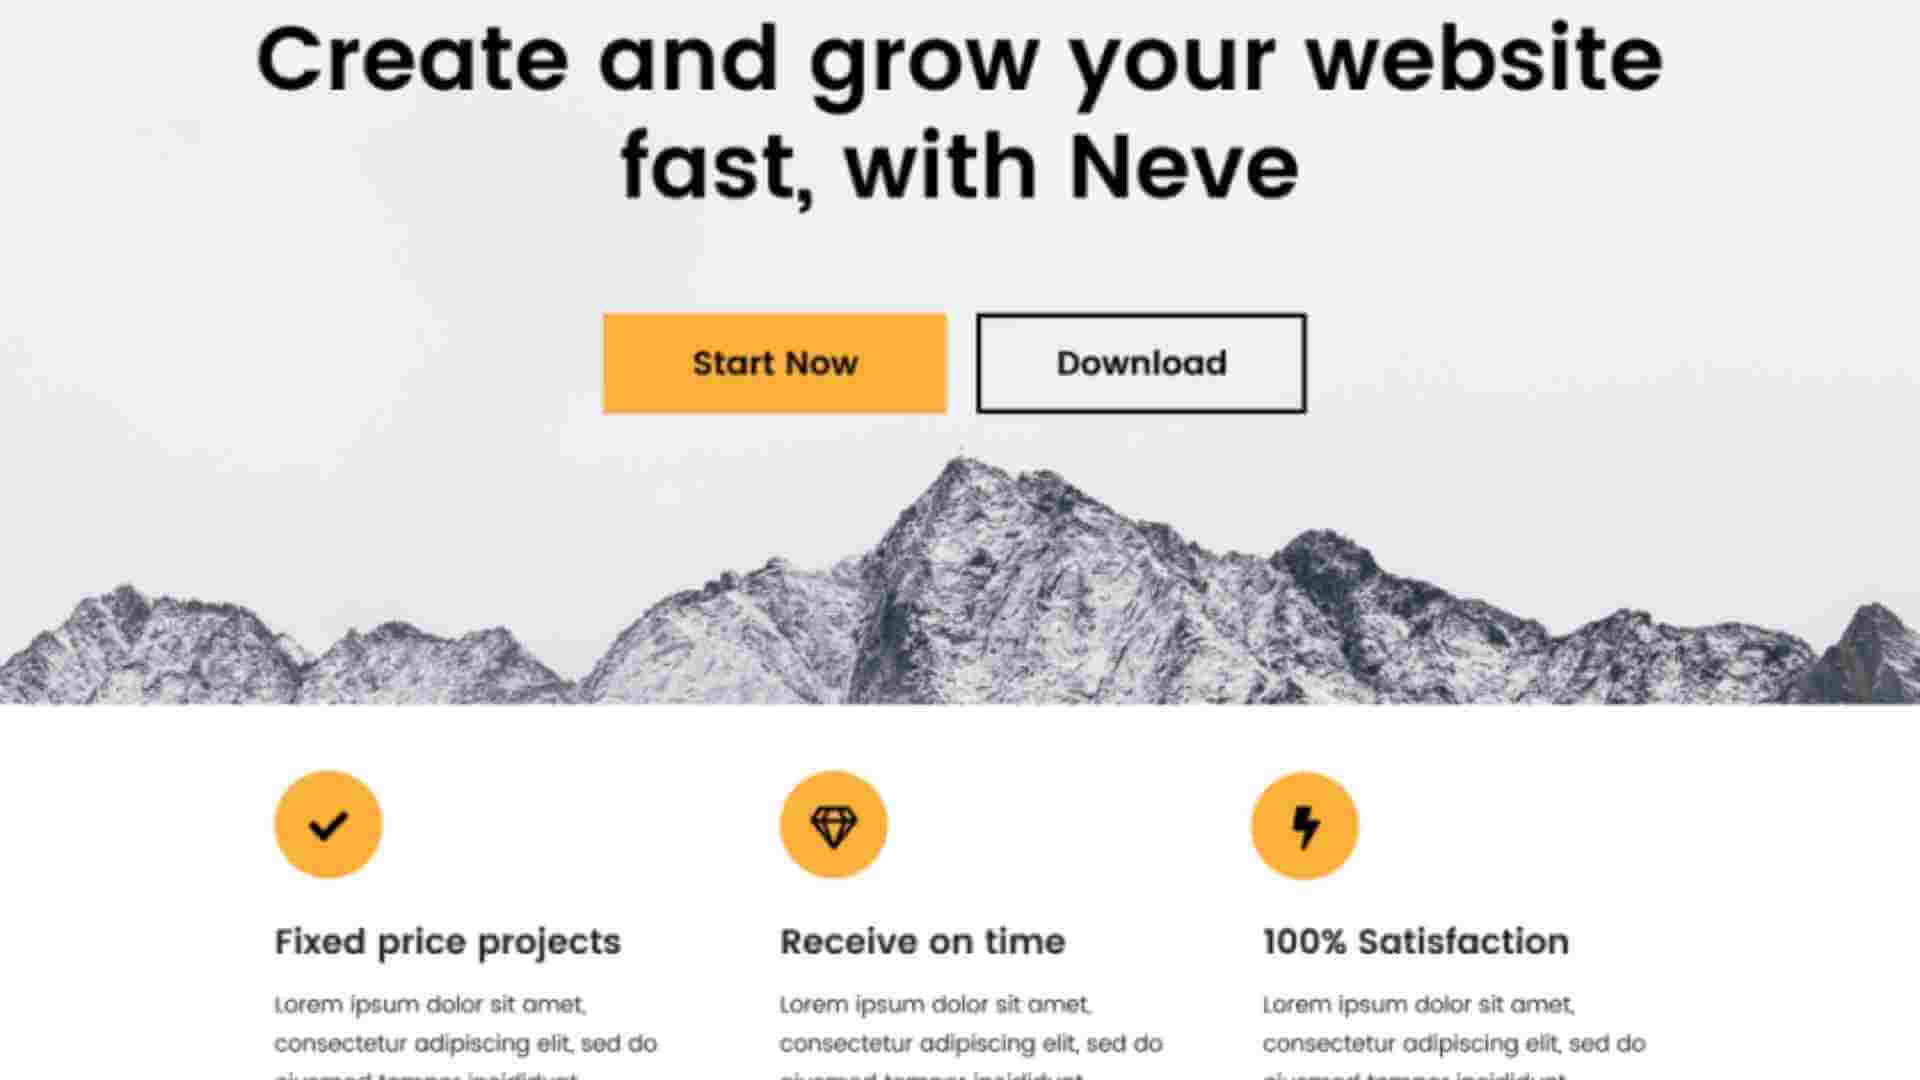
Neve: easily customizable, periodically updated, with a minimalistic design yet full of incredible features.
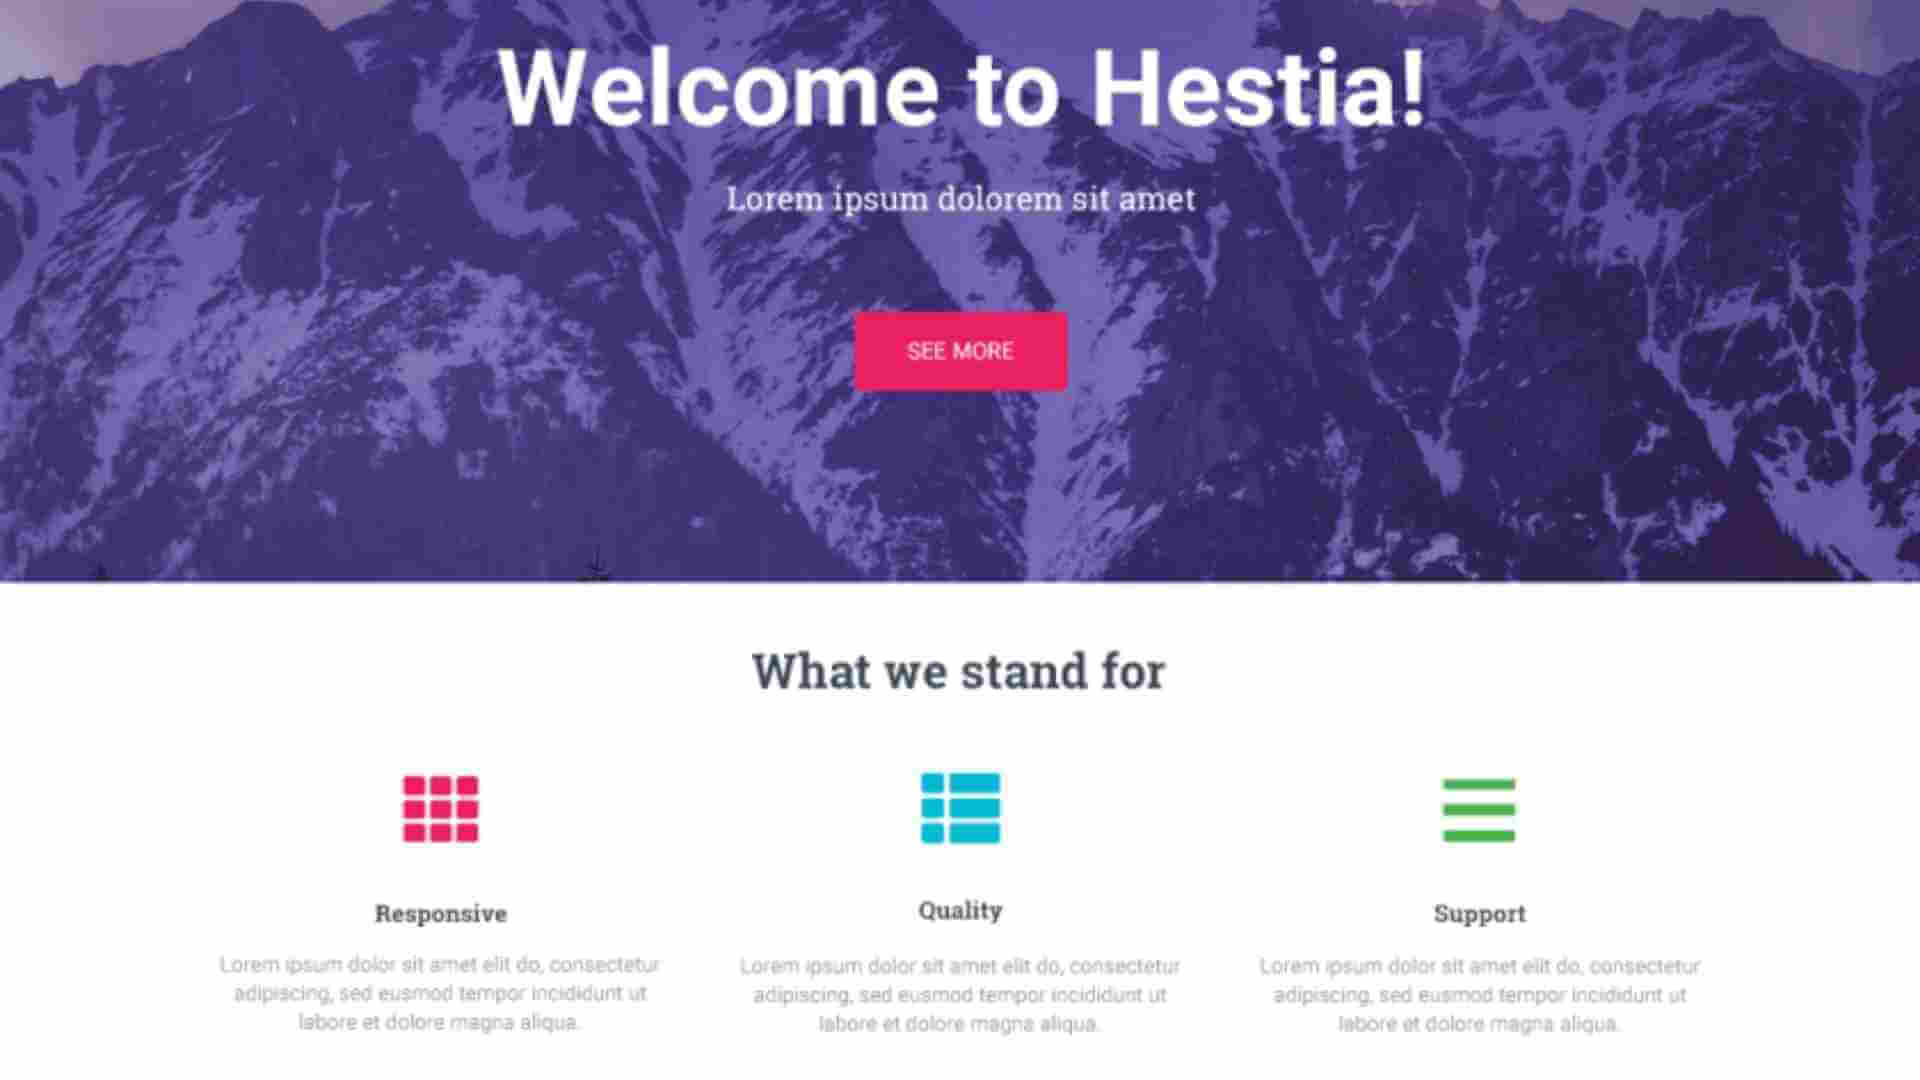
Hestia: elegant and clean design, SEO friendly, highly customizable.
If you are looking for something more exclusive, you can opt for a premium theme. And though there are a lot of them, but you can give it a closer look to these three:
- Tribe: It’s conceived specially for author websites, and therefore makes things simpler for you. It was built by Jeff Goins and it combines simplicity with amazing functionality
- Thrive Themes: Highly customizable themes, with much functionality. However, if you are not a techie, that might represent many tutorial hours.
- Cadmus: Built for author websites and easy to setup.
7. Collect the necessary Information
Before you start working on the different aspects and pages of your author’s website, make sure you have everything you’ll need. In order to help you, I’ll leave you a list of the things you might need:
Your Professional Bio: If you don’t have one, write a short description (up to 300 words) of your writing career. Be concise, try to do it in third person and do not include irrelevant information. Avoid using qualifying adjectives or including your work experience, unless is relevant to your book(s).
Book Cover Images: You need to include the cover of each of your books, but also try to get the best version of that image, that means the ones with best resolution.
Descriptions of your books: Something similar to its Amazon description. You should have both, the short and the full description of each of your books.
Reviews of your books: Collect positive reviews of your book, so you can provide your readers with a second opinion.
Links to buy your books: We’ve stated that one of, not to say THE purpose of your author website is to sell your book(s), therefore, you need to have the links to the major online retailers where your readers can get the book.
Links to your social media profile: It can be Facebook, Instagram, Twitter, Pinterest, etc. Those where you have an official author page.
Contact information: This can be your agent’s or publicist’s (if appropriate).
Don’t have a Literary Agent yet, check this article and learn how to get one!
8. Craft your Homepage
Your homepage has a huge responsibility, and that is making people get you right. This means that you don’t get a second chance for a first good impression, and therefore, your homepage should represent you and your work. Think about what kind of author you are and what kind of books you write, and make sure your homepage shows it.
Also, don’t try to put everything there. Include the most important information, and let people navigate through your website if they want to find out more.
What should be included on your homepage?
- Header
- Menu
- Headshot and short Bio
- The cover and a short description of your latest book: Make sure you include the buy buttons or the links to purchase.
- Email subscription box: Your homepage needs to be full of “call-to-action”. Make sure one of the first is inviting people to subscribe to get their emails.
- Links to Social Media where you are active and your visitors can connect with you online.
a. Create the Header
Your header is the first thing visitors will see when they get to your website, and it contains information to help them navigate and interact within the site. Although you can hire a professional to design it for you, nowadays, there are apps like Canva that make it possible for anyone to create amazing designs, headers included.
1. The first thing you need to do is to be clear about the dimensions of your header. This depends on the theme you picked before. You can find this information on the theme’s settings.
2. Once you got that clear, you need to create an account on Canva and start a new project. Select the “Use Custom Dimensions” button and enter your dimensions.
3. Now it’s time to let your inner designer come out and shine. Create a logo and save it as a PNG file. Now, you just need to upload it to your website.
b. Create the Menu
Some themes feature different menu settings. But many of them add all of your pages to your menu by default. Hopefully, you can edit your menu to have more control over what it includes. If you want to edit your menu follow these steps:
1. Go to Appearance > Menu.
2. Create a new menu.
3. Add the pages you’d like to include in your menu.
4. Select the box where the menu will appear.
5. Save the changes and go to your homepage to see if it looks the way you want.
c. Create your Newsletter Sign Up Form

This is one of the main reasons why we created the website, to get a powerful email list that will help us sell our books. Therefore, this is one of the most important parts of your website.
The first thing you need to do is select an email newsletter provider. I’ll suggest you these two options. The first one is Mailchimp, which is free and it’s O.K if you are a beginner. It’s very popular and user-friendly, however, is a bit limited compared to my second recommendation, which is ConverKit. This is one of the largest email marketing platforms and it’s both a powerful and easy-to-use tool, with incredible features. ConverKit offers a 14-days free trial and then you’ll need to pay $29/month.
If you use Mailchimp, you can learn how to create an email list and your sign up form here.
On the contrary, if you went for ConverKit, they have great free tutorials for building larger email lists.
9. Work on the rest of Core Pages
Now, it’s time to let clear what pages your author website needs. This doesn’t mean that you cannot include anything else. However, it’s meant to be a guide to make sure that your website has everything needed to be called an author website.
The main informational pages you need to include on your website are: About, Books, and Contact. There can be more, like Events (if you regularly speak or have book tours), Blog (if you have a blog, duh!) and Resources (just in case you want to share content, tips, videos, etc.), but those are pages that not every author is going to need.
You are probably wondering what you need to include on each of these pages, right? Well, worry no more, and keep reading!
About:
This is a page for your readers to know more about you and your work and media to get pictures or relevant information when needed.
On this page you should include the headshot (same picture used on the Homepage), a short and a long biography and of course, an email subscription box (which should be visible on EVERY page of your author website, and therefore won’t be making reference to it again).
Books:
You can separate it in different pages, which is the best option from my point of view. On one of them you can put all your book covers, the title, a short description, a “read more” link, and obviously, a buy button or a link to purchase it. And then, devote a single page for each of your books, on which you should include the book cover, title and subtitle, a full description, blurbs or reviews, and a purchase button/link.
Contact:
Make it clear how you can be contacted, unless you are not interested in new opportunities. Include your agent’s or publicist’s contact info if appropriate.
On this page, you can share your profile links on social media or/and your email address. Also, it would be great if you could create a contact form, which will basically send an email to you. However, it will make it easier for people who want to contact you, since it’ll save them a step.
10. Keep Improving your Author Website over Time
If you thought you were done, I’m afraid to tell you were wrong. Don’t expect to get the website of your dreams the first time, you’ll have more time to improve it and work on certain things. You’ll continue seeing other websites, and there will be things you’ll like and want to add to yours. So, get used to the idea that you are NEVER done with your website, and that it’ll always be your work in progress.
Summing up…
Although this might look like a difficult and time-consuming task (which it is), creating your own author website is possible and completely achievable. If you follow our steps and don’t get overwhelmed by the infinity of options, you’ll be building your website in the next hour.
Of course, there are more details to the building of a website, but this starter kit will surely help a lot!!
Hope you’ve found this post useful. Which do you think can be the more difficult part or step for you? Have you built any author website? Let the link in the comments below, so we can take a look at it.
